Beyond the Roll: Masking Tape Sculptures
by Becky Griffith, STEAM Educator
Step into a world where imagination takes shape, quite literally! Let’s embark on a creative journey where we explore the exciting realm of sculpture using different types of tape. Transforming humble adhesive tape into vibrant, three-dimensional masterpieces, this art form encourages us to think beyond the flat canvas and sculpt ideas into tangible creations.
First let’s look at one of the coolest types of tape, masking tape. Masking tape is a type of adhesive tape that is easily removable and is designed to create a temporary bond without leaving a residue or damaging the surface it is applied to. It is typically made of a thin paper or fabric backing coated with a low-tack adhesive that allows for easy removal. The adhesive is not as strong as that of other tapes like duct tape, making masking tape ideal for various applications where a less permanent bond is needed.
Masking tape is widely used in various applications beyond painting. It is commonly used in arts and crafts, home improvement projects, and other situations where a temporary hold is required. Masking tape comes in various widths and colors, and its versatility makes it a handy tool for both professional and DIY purposes. It is perfect for all sticky situations.
The science of masking tape considers how well the adhesive bonds to different surfaces. It should adhere securely to a variety of materials without causing damage upon removal. Masking tape is designed to be versatile and adaptable to various conditions. This includes being able to withstand different temperatures without losing its adhesive properties. The tape should remain effective in both hot and cold environments.
Masking Tape Sculpture Activity
Materials:
- Masking tape in a variety of colors
- Aluminum foil
- Permanent markers
- Construction paper in a variety of colors (optional)
- Googly eyes (optional)
Steps:
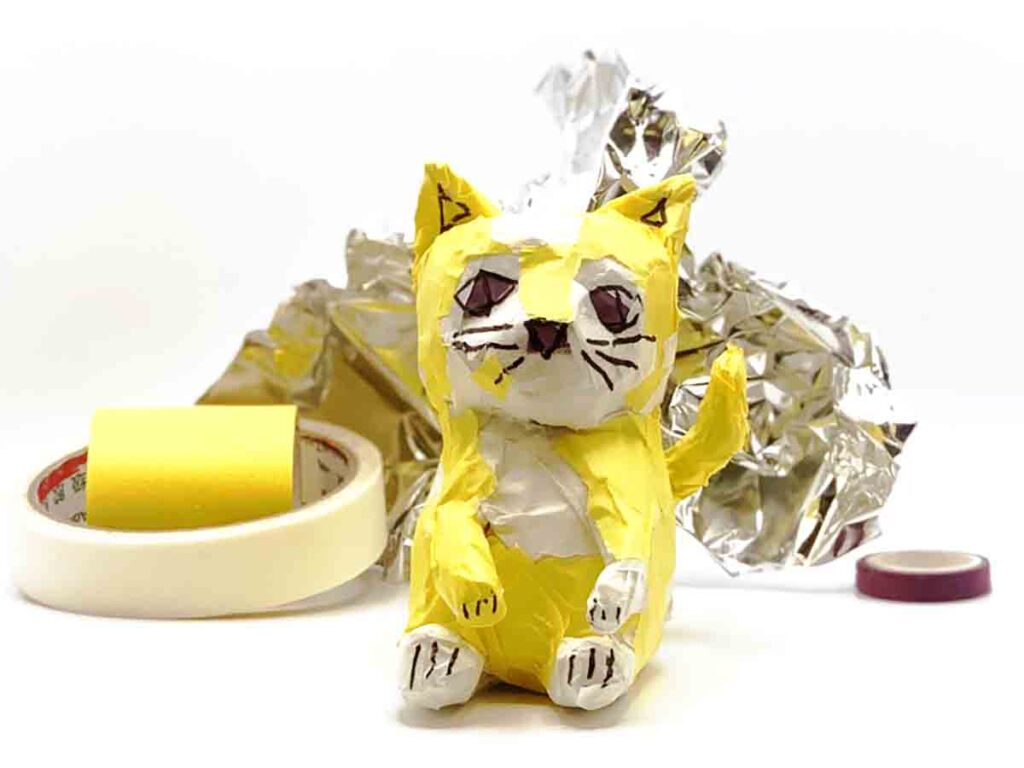
- Start by choosing a picture or photograph to bring into the third dimension. For this example, I choose to make a cat.
- Using the aluminum foil, make the basic shapes. These should be identified as the larger shapes. For my cat, I will make a circle for the head, an oval for the body, and another larger circle for his bottom. Smaller shapes like the legs and ears will be added later.
- Set aside the colors your will need. I need yellow, tan, and purple, for my cat.
- Attach your aluminum foil shapes together using the masking tape. Pick the tape that your sculpture has the most of. For my cat, I will use the tan masking tape.
- Cover your entire sculpture in your masking tape. It should look like a potato!
- Now add any mass or volume to your sculpture. For example, my cat has a snout. I will want to add more tape to form the mouth and nose.
- Add any smaller shapes to your sculpture. I will be adding a tail, two ears, and four legs to my cat.
- Now it is time to add color to my sculpture. Layer any different colors on top of the base masking tape to give your sculpture some personality. I will add purple eyes, and yellow spots to my cat sculpture.
- Add any final small details with Permanent markers. Remember masking tape is designed to resist paint, so use any alcohol-based marker.